Installation of reinforced liner in old swimming pools
 Renovate your pool and forget about constant repairs
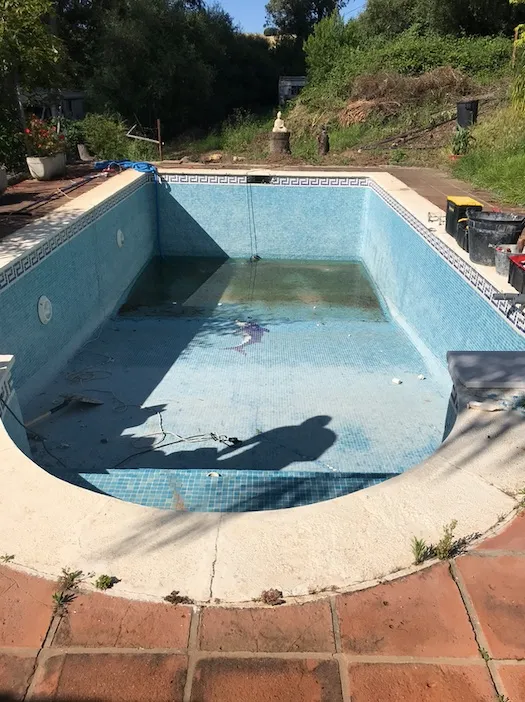
Is your pool leaking water, losing tiles, or showing cracks and chips? Traditional solutions such as patching are usually temporary. At ARG Piscinas, we transform damaged pools by installing reinforced liners. This system creates a new, completely watertight surface that seals any leaks and covers the damage to the old pool, guaranteeing 15 years of watertightness and peace of mind without any annoying construction work.
Renovate your pool and forget about constant repairs
Is your pool leaking water, losing tiles, or showing cracks and chips? Traditional solutions such as patching are usually temporary. At ARG Piscinas, we transform damaged pools by installing reinforced liners. This system creates a new, completely watertight surface that seals any leaks and covers the damage to the old pool, guaranteeing 15 years of watertightness and peace of mind without any annoying construction work.When does it stop making sense to keep repairing?
Tilework has been the standard form of wall cladding in Spain since the 1970s. Over the years, the same four problems always crop up, and they all stem from the same cause: cladding made up of individual tiles and grout lines laid over a substrate that expands and contracts.
Loose or detached tiles
The bonding mortar loses its adhesion due to cycles of thermal expansion and contraction. Once pieces start to fall off, the process accelerates: water seeps in through the exposed area and erodes the mortar next to it.
Joints that are blackened and covered in algae
The grout is porous and traps microorganisms and dirt that chemicals are unable to remove completely.
The swimming pool is leaking
When the leak is beneath the cladding, patching it up only masks the symptom, not the cause.
Repairs are expensive and don’t solve the problem
Repairing loose tiles costs between €300 and €800 depending on the area affected, and rarely provides a permanent solution.
The problems with mosaic tiles and their alternatives
What happens in your swimming pool every day?
Day 1 — Emptying and removal
Empty the bath and remove the existing lining: liner, loose paint or unsalvageable tiling. Carry out a structural inspection to identify cracks and areas requiring repair.
Day 2 — Repair and preparation
Cracks are repaired using a specialised mortar, the surface is levelled where necessary, and perimeter anchoring profiles – made of stainless steel or PVC – are fitted.
Day 3 — Geotextiles and pattern-making
The geotextile is laid out over the entire reservoir and the layout is planned: the cutting and arrangement of the panels on the surface, in accordance with the preliminary plans.
Day 4 — Hot welding
All joints between panels are welded using a hot-air welder. This is the most technical stage: each weld is checked with a test probe to verify penetration.
Day 5 — Sealing, fittings and filling
The perimeter joints are sealed using the manufacturer’s sealant, the frames for the skimmers, jets and spotlights are fitted, and the pool is filled.
How much does each type of cladding cost?
Indicative prices for 2026 for an 8 × 4 m swimming pool, with a total surface area of around 68 m² (including the base and walls). The total costs are higher than simply multiplying the square metre price, as they include the excavation, ground stabilisation and structural frames.
| Coating | 8 × 4 swimming pool | Per m² | Service life |
|---|---|---|---|
| Painting | €1,500 – €3,000 | €12–18 | This should be repeated every 2–4 years |
| Liner | €3,000 – €4,500 | €35–50 | 8–12 years |
| reinforced liner | €4,000 – €6,500 | €50–70 | 15–20 years or more |
| Gresite | €5,500 – €9,000 | €70–100 | The most expensive repair in the future |
What the budget should include
It’s difficult to compare quotes when each one covers different items. A professional tiling job includes these five items; if any are missing, they’ll appear later as extras.
Emptying and cleaning the tank
At the discharge rate required by the volume and the pump’s flow rate.
Cleaning the bracket
Repairing cracks, holes and loose areas before tiling. This is what a cheap quote tends to overlook.
Perimeter profiles
The panel is fixed to the edge, which is made of stainless steel or reinforced PVC.
Fitting the cladding
Pattern-making, hot welding and inspection of each joint.
Sealing of special parts
Skimmers, nozzles, spotlights and drains: the points where leaks reappear.
Projects completed using this service
- Rehabilitación con lámina armada TOUCH TROPICAL
- Rehabilitación Completa ROCHE - Conil de la Frontera
- Piscina Comunitaria en Costa Ballena
What people ask us before signing up
Do you have to empty the pool to do that?
Yes: the reinforced liner is installed on top of the dry substrate. There are specific techniques that do not require this, and we go through them in how to waterproof without draining.
How many more days will the swimming pool be closed?
Between three and five working days for a standard residential swimming pool. The timeframe varies depending on the size and shape of the pool — an infinity pool or a communal pool with an overflow takes considerably longer —; the full ranges are available at the installation time guide.
Is it a better option than re-tiling?
If the swimming pool is more than fifteen years old, has suffered from leaks, or you’re looking for a refurbishment that will last twenty years, reinforced liner is the best option. Tiled finishes remain a viable option in well-executed new-build projects or when a ceramic aesthetic is required. The full comparison can be found at reinforced liner versus mosaic tiles.
How long does a reinforced liner last once it has been installed?
Between fifteen and twenty-five years without any major work, depending on how well the water is maintained. We set this out in How long does a reinforced liner last?.
Is it possible to cover the mosaic tiles without chipping them away?
The sheet is installed over the refurbished pool and covers any damage to the old lining; any unused material is removed. The technical process, including the tools and materials required, is as follows: Step-by-step installation.
What maintenance is required afterwards?
The usual water conditions, with no special treatments for the film. We publish the calendar month by month at the monthly maintenance guide.